Wednesday, December 28, 2011

Sheriman's Wedding Cake Part II

I can't help creating a second post on Sheriman's Wedding Cake, credit to family members who painstakingly took hundreds of The Cake pictures for me. Err, wellll, not exactly HUNDREDS, but there are SO MANY of The Cake pictures that it took me HOURS to go through all those pictures and to select some for this post.

PHEW! (anyway, thank you guys... you know who you are ;), I love you all..)

So, without further ado, here's the second part of The Cake, at the venue itself... K-Club, Taman Melawati.

TA-DAAA!


The Cake, situated near the Wedding Dais, sharing the glamour...:)


View from the Wedding Dais, you can see some guests eating at the round tables...


Aha, the most precious picture, the groom and his bride cutting The Cake.
They are so adorable, aren't they? (hmmm, maybe I'm a little bit biased here...:))


Another view of the cake cutting ceremony....


The Cake, before they cut it...


Yes, it's yours truly, cutting the cake for the guests...


The cake on the plate, ready to be eaten...


Again, dear Sheriman and Noriah, here's some prayers from this auntie:

Barakallahu lakuma wa baraka alaikuma wa jama'a bainakuma fil khair..

(from Maher Zain's song - Barakallah , check-it-out!)


Friday, December 16, 2011

Sheriman's Wedding Cake

At last, the day that's we have been looking forward to this year, the Wedding of The Year (of the Adnan's clan) has arrived! Sheriman's wedding!

But I am not going to tell about the wedding, of course! I just want to tell about the Wedding Cake *smile*, which I have been (gleefully) planning for weeks!

I have done his engagement cake here, and I feel honored to do his Wedding Cake too. Of course the Wedding Cake must be spelled in CAPITAL letters, because to me it is soooo very, very important, the grandest cake of all mother-of-cakes *grin*.

I really had so much fun planning, baking and decorating this cake. I am so glad that Sheriman gave me the freedom to do whatever cake I had in mind. Oh, not so much freedom, he had two requests that I have to comply - the cake must be the usual chocolate moist cake that he likes and the theme color must be in white and silver/ gray. No problemo!

In any new baking projects, as much as I can, I try to do something new, by challenging myself in doing something that I have never done or tried before. It's so much fun and exhilarating! I wish I had more time (and occasion *grin*) to experiment more! Anyway, back to The Cake, I have accomplished the following skills/design, which I have been planning to do:

- Tiered fondant cake
- Stacked fondant cake
- Applying fondant on a square cake
- Applying fondant on a BIG square 11-inch cake (this is really a challenge!)
- Doing both stacked and tiered cakes in one project
- Make roses in a new way - learnt from youtube!
- Learn how to 'cover' imperfections(?) on a fondant cake... LOL!

Now, let's view The Wedding Cake......ta-da!........


The "topper", 7-inch round fondant choc moist cake with simple white roses,
adorned with silver balls (as dew drops) and ribbons.


The stacked "base", square 11-inch and 8-inch fondant choc moist cake adorned with connelli design (royal icing) and white fondant daisies with silver balls.
Not to forget the silverish gray ribbons!


Here's the square stacked cakes from top view.


Phew! Here's the 3-tiered stacked + tiered Wedding Cake *smile*.


Another view of The Wedding Cake.
I'm so glad the cake was successfully done, Alhamdulillah...

I would like to thank my cake mentor who have given me some tips and advice and my family for their endless support. I took me two whole days to finish it! The cake was so heavy that we had to plan carefully to transport it. Next time I'd know better!

And to the newlyweds, Sheriman and Noriah, Congratulations! Wish you the very best in this life (and Hereafter too!). Also, Congratulations to Kak Dah and Abang Din for the new addition to their family!

Saturday, October 8, 2011

Macaron oh Macaroon!

My first burning question before posting this entry is the difference between macaron and macaroon. I found that everywhere (well. almost everywhere) in the blogosphere that bloggers use these two words interchangebly. It's rather confusing for an inborn spell-checker like yours truly :). (Spell-checker? Reaaaalllly?... my children would laugh if they read this post)...

So, what's the difference actually?

According to wikipedia, macaron is a sweet confectionery made with egg whites, icing sugar, granulated sugar, almond powder or ground almond, and food coloring. The macaron is commonly filled with buttercream or jam filling sandwiched between two cookies.

Macaroon is a type of light, baked confection, described as either small cakes or meringue-like cookies depending on their consistency.

Therefore for a layman like me, I can conclude that basically macaron is two macaroons sandwiched together :). Is that correct? Wow, that's a relief to know!

Although this post is late, I would like to document my adventure baking these little creatures. They have feet you know, that's why I refer them as 'creatures'...

I tried several times, the last one better than the previous ones (Thank God!). Anyway, it does not matter if you got it wrong, although they don't look as you expect them to be, the taste is still the same. In other words, if your macarons become a disaster, you can rename it to macaroon, isn't that swell? :)

As you can see here, this is my first try... they looked nice on the baking tray, looking all pink and healthy...


This pic is during the 'drying' phase, before putting it into the hot oven...

This was my first batch :( ... the 'feet' went all over the place. The 'feet' growed on heads, shoulders and bodies :(. They should be where all feet should be - at the bottom.

This was my second (or third) batch. They looked better, don't they? The 'feet' all dutifully stays at the bottom :)

Here's all the 'good-looking' macaroon-that-turned-into-macarons. They are filled with buttercream filling.

And here are the all the macaroon-that-stay-as-macaroon in a plate. They can also be called as meringue cookies! That's a glamorous name for discarded macarons :).

In conclusion, there is still room for improvement!

This adventure is just the beginning...

Monday, May 30, 2011

Happy Birthday Cik June!

It's been a while that I last made vanilla cupcakes.

So, when somebody ordered this blue-themed vanilla cupcakes, I jumped at the chance! And, the best part was, I was given a free reign to design whatever I feel fit for the occasion!


Blue-themed English bouquet, my favourite design...


View from side...


View from top of box...


Extra cupcakes for Hasif's teachers,
Happy Teacher's Day for BBS Q-Dees teachers!


Happy Birthday Cik June!

***Note: While busy decorating these lovely cupcakes, I got the sad news that my beloved Grandma has passed away... Al-fatihah...


Sunday, May 22, 2011

Hasif's 6th Birthday Cake

I scratched my head to think what theme to celebrate Hasif's birthday this year. The previous year was Ben 10. Before that it was Spongebob Squarepants. At last I settled on Cars theme for this year. As I didn't think I will have the time to do a complicated cake, I decided to decorate with edible image. Simple! Just order from my friend Lea.

As last year, Hasif preferred/agreed to celebrate at his kindy, together with his friends and teachers. Phew! I prefer that too! Less hassle to this busy mom...

These are the things to do if you want to celebrate your children's birthday at his/her kindergarten/school:
1. Call or talk to the class teacher, asking for permission and state the celebration date.
2. Tell the teacher what things (food, cakes, party packs etc.) you wish to bring to school, so that the teacher can be prepared.
3. Ask the teacher what time you can bring those things and whether you (or other people) could attend too or whether the teacher could manage without you coming along (or whatever plan you have in mind...:)..)
4. Not to forget, it is important to ask the teacher anything else needed to make the celebration smooth and enjoyable for all. In my case, the teacher reminded me of paper plates and how many party packs that I should prepare. I threw in some disposable forks and spoons too. And serviette.
5. Lastly, prepare everything in advance so that you won't forget anything.

So, here's what I prepared for Hasif....


This light-blue-coloured, 11-inch, 5-kilos square choc moist cake took hours to decorate!
It is more difficult to smooth a square cake compared to the round one.
Not to mention a BIG cake like this!


The sleepy Hasif, with the cake just after I finished decorating, nearly at 1.00 am.
He insisted to wait until I finished decorating...he could't wait to look at the finished product...
Isn't that sweet of him...


A little detail at the side of cake....


Hasif with his friends at the kindy... (it was gym day, thus the t-shirt...).
Smile for the camera! Cheeeeese!


Happy Birthday Hasif! We love you very much!
Muah, muah, muah...


Monday, May 2, 2011

Butter Cake for Shamsul's Fiance-to-be

It's been a long time that I have last updated this blog. In fact there are some baking projects that I have not updated yet. Sorry peeps. I'm up to my ears with work nowadays :(....

Having said that, it takes a really special event that motivate me to publish this post. Ahem!

What event?

It's the 'merisek' event for Shamsul, my niece! Merisek is a pre-engagement tradition that most Malays still practise. Nowadays it is usually a small event only attended by the parents of both parties, at the girl's parent's house.

But for Shamsul, it was quite a big affair, similar to an engagement.

Thus, it needs a cake! A beautiful (ahem..) cake!

Here it is!


I have been finding the opportunity to try this two-toned rosebuds! At first it was a challenge, but after a while, it's a breeze! Love it! I will surely add this to my repertoire!


More simple two-toned roses at the bottom of the cake...all around the cake...

More rosebuds at the sides...

Lastly, packed in the decorated, transparent box to be presented to the fiance-to-be...


It's a joy to decorate this cake.

Thanks Kak Sal and Shamsul for the trust in me.

For Shamsul, really happy for you and please take care, dear....

Sunday, March 6, 2011

My First Red Red Velvet

Happy Birthday Darling Dalilah!

Since Dalilah's birthday was in the middle of the week, I had to do this cake in 'instalments'. Firstly, I bought the ingredients bit by bit the week before, measured the ingredients and sifted the dry ingredients on Saturday, baked the cake on Sunday and lastly, made the icing and decorated the cake on Tuesday.

Phew!

It's okay, I enjoyed it tremendously! I love trying new cakes especially when there is an occasion where I can try it (without much risk *smile*). Thanks to my dear cousin for the great recipe. I peeped here too for additional tips (thanks Min *smile*).
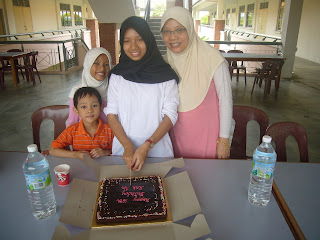
Here's the precious cake for a precious girl!


The red velvet, perching on Dalilah's study table...


A shot from another angle... it's quite a challenge to do this wavy design
(instead of a smooth and clean design)... surprise, surprise!


Aha, a rare gem... a picture of my cake, after it was cut...
I managed to do a 2-layer only...


Darling Dalilah, celebrating with some of her close friends... after
Puteri Islam co-curriculum activity (can see her Puteri Islam t-shirt *smile*)...


May Allah bless you always, my little darling girl!

We love you very much!

Tuesday, February 15, 2011

Happy 16th Birthday Kak Na!

This entry is specially dedicated to my wonderful daughter, Diana, who celebrated her 16th birthday last weekend.

They say, a picture is worth a thousand words....err, in this case, pictures worth thousands of words...


We love you Kak Na!

May Allah be with you always!

Monday, February 14, 2011

Sheriman's Engagement (5-2-2011)

OMG! At last, this nephew of mine is getting hitched!

At last! And I'm so very glad to hear the news, as I was afraid he's going to be a 'bujang terlajak'....*grin*.

And he ordered these 2 cakes just a week before the event. Luckily I still have some of the required ingredients for fondant, lest I have to dash to Lea-Oven at Putra Heights to get them. The rest of the ingredients and 'accessories' can be found around Selayang.

First, he ordered chocolate moist cake for him (and family ?) to eat. I'm glad he likes my cake!


Simple chocolate moist cake with ganache.
The date should be 5-2-2011 (I was late by a month :(...) , which is the date of his engagement.
However, I managed to correct it but forgot to snap the 'after' picture...
Oh, well...*smile*

Second, the engagement cake itself. A fondant cake (red theme) with chocolate moist cake inside...

Ta-da!


This is the finished product, after putting the cake inside the see-through box.
The event was held at Simpang Pulai, Perak. Thus, I supplied the box too, with very simple decorations. For safety purposes *grin*...


View from top, before 'sealing' it inside the box..


Picture snapped before putting more 'accessories' onto the cake, ie., golden ribbon and gold beads... Some says it looks better like this, simple and clean...
Oh, well...*smile*


Anyway, Thanks Sheriman (Along) for trusting this not-so-ole' auntie to do this cake for your err, fiancee...

Congratulations Sheriman and Noriah for their engagement! Hope both of you will be wedded before end of the year!

Ha ha ha!

Sunday, February 13, 2011

Meatloaf

You can do no wrong with this meatloaf recipe. Especially if your family love burger, sausages and the likes. You can eat it by itself, with bread, any kind of pratha bread or even with rice.

I got it from my friend, Sue, who is now recuperating at home from the effects of chemotheraphy after her mastectomy surgery. She directed me to the website link, but I forgot the website :(. Anyway, thanks a lot Sue, and hope you get well soon!


Ingredients:
1. 2.5 lbs of ground beef
2. 3 eggs, beaten
3. 6 oz herb-seasoned dry bread stuffing mix
4. 1 cup hickory smoke flavored barbeque sauce
5. 1 onion, finely chopped
6. 1 teaspoon minced garlic
7. half cup milk

for glaze, combine 1 cup barbeque sauce and 1 cup brown sugar

Directions:
1. Preheat oven to 175 C or 350 F. Grease 9 x 13 inch baking dish.
2. In a large bowl, mix items 1 to 7 and placed into prepared baking dish. Shape into 2 loaves.
3. Pour glace over the 2 meatloaves.
4. Cover the baking dish and and bake for 60 to 90 minutes. Uncover the last 15 minutes of baking time. Let sit for 15 minutes before slicing.


Note: I used chilli sauce instead of barbeque sauce as I don't have any barbeque sauce in my kitchen. I also put some curry powder too since I used plain bread crumbs plus some leftover cream crackers (crushed) instead of 'herb-seasoned dry bread stuffing mix'. No worries. you can mix and match according to your taste and likings :).

It's yummylicious!

Simple Butter Cake - Episode 2

In my previous post, I have submitted a recipe for a simple butter cake.

However, I did not include the accompanying pictures as I wrote it from a different device on which I didn't have the uploaded pictures.

Now, at last my desktop (where I keep all my pictures) is out of the workshop and has been 'cured', Alhamdulillah. So, here are some pictures that should accompany my previous post.


I don't have the full cake picture - forgot to take...:(


The cake was well-received by my family and friends, and I personally think the texture is suitable for fondant decorations.

Hope you can try it and report the results to me!

Saturday, January 29, 2011

Recipe: Simple Butter Cake

This is a request from Yah, Ros and Kak Zah. I brought the cake to the office, already cut to pieces as I didn't decorate it this time. They liked the taste and texture of the cake and requested the recipe. I forgot where I got this recipe, but I've already amended it according to my liking. It's a bit on the sweet side, so you are welcomed to lessen the sugar or the condensed milk if you prefer a not-too-sweet cake.

So, here you are!

Ingredients:

250 gms butter (1 stick)
200 gms castor sugar
210 gms all-purpose flour and 1 teaspoon of baking powder (sift together)
5 eggs
1 teaspoon vanilla essence
4-5 tablespoons of condensed milk

1. Stir butter, sugar flour and baking powder in a cake mixer until sugar is dissolved.
2. Add the eggs one by one and continue stirring.
3. Add vanilla essence and condensed milk. Continue stirring for about 4 minutes. Don't stir too long, okay.
4. Pour into an 8 or 9-inch baking pan and bake for about 45 minutes 170 C (depending on your oven) or until inserted toothpick came out clean.

* This cake is a bit different because as the usual convention is to cream the butter and sugar first before adding in the rest, usually saving the flour for last.

But, do try it! I'm sure it will change your mind about baking a butter cakes after this!

Saturday, January 8, 2011

31.12.2010

Denai Alam.

That's the name of place that this cake went to on 31.12.2010. A warm home. A housewarming-of-sorts event. A gathering of families of a family, bounded by love, surrounded by wonderful food and laughter, praying for Allah's blessing and the for the best that life can offer.


My favourite cornelli design on chocolate moist cake, adorned only with the 'date'.


To Abang Oli, Kak Ros, Kak Long, Aiman, Aqlie and Arief,

Wish you all the best in your new home!!